Topics
- Urgent Help
- Sales Module
- Discuss
- Calendar
- Live Chat
- Website Manager
- Property Management System
- Room Servicing
- Extras
- Emails
- Creating Email Templates
- Selling Groups
- Customer & Companies
- Agents & Sales Channels
-
Rates
- Dynamic Rates
- Back End Setup Dynamic Rates
- Room Rate Selling Group Mapping
- Rate Calculation
- Back End Bookings
- Front Booking Screen Dynamic Rates
- Rates & Min Stays calendar screen
- What your Customers See
- Changing Rates - Guide
- Price Change Long Term
- Change Min Stay ( long term)
- Multiple Min Stay Prices
- Day of Week Price Variation
- Create New Rate
- Promo Codes
- Bookings
- Acquire Credit Card Details
- Make A Booking
- Full New Booking
- Cancel a Booking
-
Payments & Invoicing
- Invoice & Debtors
- Invoice Due Date
- Create Invoice
- Invoice Payments
- Reasign Invoice Payment
- Cancel / Amend Invoice
- Invoice Agents Comissions
- Invoice Journaling
- Reset Audit Errors
- Debtors
- Adding A Booking Payment
- Refund A Booking
- Charge Cancellation Fee
- Split Payments
- Customer & Company Account Trans
- Amend / Delete Booking Payment
- Reports
- Marketing Module
- Settings
Setup Promo Codes
Once Promo Codes have been enabled in your account, you will need to set up a promotion record that will manage how it will operate.
Since the promo code will be added to the booking as an extra, you will first need to register the extra in your system so that you can assign that extra to the promo code. The extra will be the discount or the benefit that will be added to the booking.
Some useful Tips:
Save all the promo extra's under the same Extra category as you can then distinguish between each one (for example, a category called Promotions). This also highlights the discount or reward to the customer.
If you are offering a free service or product, you will need to set the extra with a $0 cost.
If you make the $0 price valid for specific dates, then the promo code will only add the free service or product when the booking is for the dates that have the $0 price.
You can use different promo codes for the same extra. For example, you could offer the same discount to all your wedding parties but provide different codes to the different parties to personalise the discount to each of them (by using codes like John&Jen, Ken&Barbie, etc)
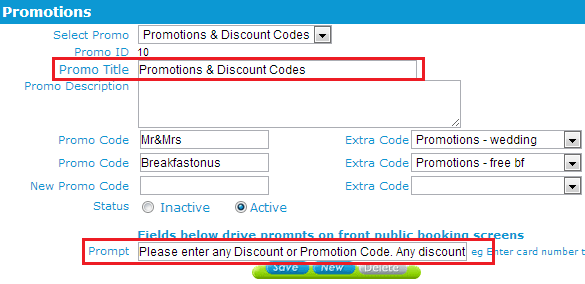
Once the extra is registered in your system, click on the Promo Code Management option (in the Extras section in the menu), and this will open the following screen:

Explanation of each field is below with an example to follow:
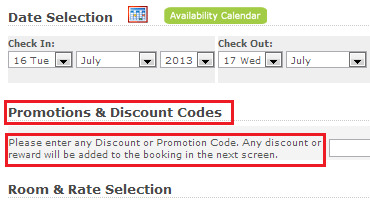
Promo Title – This is what is displayed on your public Booking Screen as the title of the section (for example, Promotion and Discount Codes).
Promo Description - This is not necessary but you can add text here if required.
New Promo Code - This is the code that the customer will need to enter to get the discount or reward.
Extras Code - This is the iBex name for the extra that will be added to the booking as the promotion.
Status - Set to Active to activate the codes.
Prompt - This will be displayed on your public Booking Screen (for example, Please enter any Promotion or Discount Code to receive your discount or reward).
When complete, you should have a screen similar to the example below which would appear on your booking screen as shown below.


After setting up a Promo Code it is recommended that you test it on the public booking screen on your website before providing it to anyone so that you are aware how it is displayed to your customers.
Promotions can be disabled at any time by deactivating them. This is done by clicking the Inactive option in the Status options in the bottom of the Manage Promotions screen.
