Topics
- Urgent Help
- Sales Module
- Discuss
- Calendar
- Live Chat
- Website Manager
- Property Management System
- Room Servicing
- Extras
- Emails
- Creating Email Templates
- Selling Groups
- Customer & Companies
- Agents & Sales Channels
-
Rates
- Dynamic Rates
- Back End Setup Dynamic Rates
- Room Rate Selling Group Mapping
- Rate Calculation
- Back End Bookings
- Front Booking Screen Dynamic Rates
- Rates & Min Stays calendar screen
- What your Customers See
- Changing Rates - Guide
- Price Change Long Term
- Change Min Stay ( long term)
- Multiple Min Stay Prices
- Day of Week Price Variation
- Create New Rate
- Promo Codes
- Bookings
- Acquire Credit Card Details
- Make A Booking
- Full New Booking
- Cancel a Booking
-
Payments & Invoicing
- Invoice & Debtors
- Invoice Due Date
- Create Invoice
- Invoice Payments
- Reasign Invoice Payment
- Cancel / Amend Invoice
- Invoice Agents Comissions
- Invoice Journaling
- Reset Audit Errors
- Debtors
- Adding A Booking Payment
- Refund A Booking
- Charge Cancellation Fee
- Split Payments
- Customer & Company Account Trans
- Amend / Delete Booking Payment
- Reports
- Marketing Module
- Settings
Create A New Extra
Extras can be services and products that your customers may want to add to their bookings (such as breakfast, tours, etc), and/or any additional charges that you may need to add to bookings (such as discounts, cancellation fees, commission charges, breakages, etc).
You can set different charge types for each extra (for example, Per Person, Per Day, Per Booking, etc) and whether the extra is mandatory, available to all bookings, or restricted to specific rates and rooms. The price of the extra can also be automatically calculated as a percentage of the room value.
Once an extra has been registered in your iBex account, it can be booked by your customer's online or manually added to a booking at any stage.
Instructions :
-
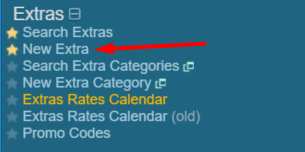
Select New extra in the Extras section in the menu
-
The Extras Code field will advise that you are Registering NEW Extra
-
Fill out the fields as necessary using the field descriptions below...

Tip - There are many enhanced features for extras but for a standard extra, we recommend that the fields in bold below are the minimum completed.
-
Select Extra: Ignore as setting up a new extra.
-
Name: Enter what the extra is called. This is what the customer will see and select on your booking screen (for example, Continental breakfast)
-
Short Name: This is what the extra will be referred to in your iBex system so enter something that tells you what it is (for example, bfast)
-
Category: Select the category that you want the extra to belong to.
-
Pre-defined Type: This option will only be shown to users with certain options - Only select if the extra is directly related to this type as it controls additional functionality.
-
Supplier Name: This option is only shown if you use Vouchering within your system. Enter the supplier if the extra is provided by an external provider.
-
Description: Add a full description of the extra. This will also appear on your booking screen when the customer opts to view the extra's details.
-
Instructions: Only required if necessary (for example, Please be at the pick up point 15 minutes before departure)
-
Tax Code: Set the tax that applies to your extra (eg. GST, VAT)
-
Charge Method: Set how you want the extra to be charged to your customer
-
Each - Your customer can select as many as they want. If Each is selected here, the field Percentage Charge will show enabling you to set a percentage as the amount to be charged (or discounted) with a maximum amount - please see Percentage Based Extras for further details
-
Per Hire - The charge will be for each hire
-
Per Booking - The extra will be charged once per booking
-
Per Person - The extra will be charged once per person and once selected allows you to select who the extra can be applied to
-
Per Person Per Day - The extra will be charged once per person and once selected allows you to select who the extra can be applied to and the number of days it can be charged
-
Per Week - The extra will be charged once a week and once selected allows to set the number it can be charged
-
Per Day - The extra will be charged once a day and once selected allows to set the number it can be charged
-
Per Night - The extra will be charged once a night and once selected allows to set the number it can be charged
-
Max Per Booking: You would use this if you have a limited number of the extra (for example, cots per booking)
-
Max Booking Period (Days): Add if you have a maximum period that the extra can be booked for
-
Non Refundable: Select if this extra is not refundable if booking cancelled.
-
Individual Sale: Select if this extra can be sold individually
-
Prevent Past Bookings: If enabled and the extra's from date is before the current date/time, it will be changed to the current date/time.
-
Mandatory Front Screen Bookings: Select if this extra is compulsory for your customers in order for them to complete their booking on your booking screen
-
Mandatory All Bookings: Select if this extra must be added to all bookings even if not selected
-
Show unavailable: Select if you wish to show this extra when it unavailable on from booking screens
-
Available with public bookings: Select if your want this extra to be bookable by your customers on your booking screen
-
Cost of Sale: Select if this extra is to be shown in the sales and occupancy report
-
Valid for Properties: Applies to Multi-Property accounts only - Select the properties that can use this extra
-
Valid for User Groups: Select which Selling Groups can use this extras
-
Report Groups: Add as required
-
Only Valid for Rate Codes: If you want only certain rates to be able to use this extra, any rates set will be displayed here
-
Valid for New Rate Code: As above, you can add the iBex Rate Code for any rates that you want to use this extra (the iBex Rate Code is on the Maintain Rate Rules option in the menu)
-
Not Valid for Rate Codes: If you want the extra to be used for all rates except certain ones, you can do. Any rates set will be displayed here
-
Exclude for New Rate Code: As above, you can add the iBex Rate Code for any rates that you do not want to use this extra (the iBex Rate Code is on the Maintain Rate Rules option in the menu)
-
Comments: Add your own comments here. They are not shown to customers.
-
Status: You can make an extra inactive at any time by selecting here.
-
Once completed, click Save
-
You have now added the Extra to your system so you can now load the prices that you want to charge for the extra (unless you are setting up an automatic Credit Card Charge, Phone Control, or a Percentage Based Extra as these do not need pricing added).
At the bottom of the screen, select the Create New Rate Period option
-
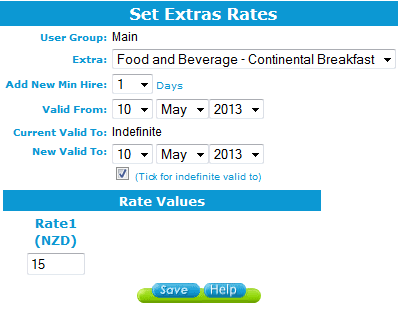
This will bring up a new pop up screen Set Extras Rates
-
Select the Extra that you are adding the rate to (if it's not already selected)
-
Select the Minimum stay required (usually 1)
-
Select the Valid from and Valid to dates (or tick the box to set the price to indefinitely)
-
Enter the required price you want to charge
-
Click Save

You have now completed setting up an extra so we recommend that you check that it works as expected in your system and on your public booking screen.
* In iBex, open a booking and go to the Extra's tab and add the extra to the booking. You can easily remove it after.
* On your public booking screen, the extras options are shown after a customer has selected the room that they wish to book.
If you make any changes, you will need to re-open your booking screen in a new tab so that it has been refreshed and show any new changes.
