Topics
- Urgent Help
- Sales Module
- Discuss
- Calendar
- Live Chat
- Website Manager
- Property Management System
- Room Servicing
- Extras
- Emails
- Creating Email Templates
- Selling Groups
- Customer & Companies
- Agents & Sales Channels
-
Rates
- Dynamic Rates
- Back End Setup Dynamic Rates
- Room Rate Selling Group Mapping
- Rate Calculation
- Back End Bookings
- Front Booking Screen Dynamic Rates
- Rates & Min Stays calendar screen
- What your Customers See
- Changing Rates - Guide
- Price Change Long Term
- Change Min Stay ( long term)
- Multiple Min Stay Prices
- Day of Week Price Variation
- Create New Rate
- Promo Codes
- Bookings
- Acquire Credit Card Details
- Make A Booking
- Full New Booking
- Cancel a Booking
-
Payments & Invoicing
- Invoice & Debtors
- Invoice Due Date
- Create Invoice
- Invoice Payments
- Reasign Invoice Payment
- Cancel / Amend Invoice
- Invoice Agents Comissions
- Invoice Journaling
- Reset Audit Errors
- Debtors
- Adding A Booking Payment
- Refund A Booking
- Charge Cancellation Fee
- Split Payments
- Customer & Company Account Trans
- Amend / Delete Booking Payment
- Reports
- Marketing Module
- Settings
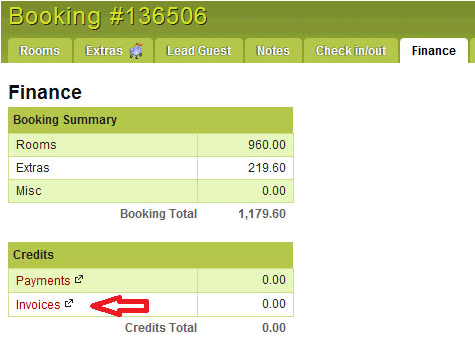
Create Invoice
You can create an invoice at any time.
A couple of important notes about invoicing:
- You can invoice separate booking items on multiple invoices.
- You cannot split any single booking item (eg. a room) on an invoice.
- If you want to invoice a part of a room cost between multiple guests/parties, you will need to create a separate guest account for each party as necessary before creating the invoice.
- The room will then be in 2 items allowing each to be invoiced separately.
To demonstrate how to create an invoice, it is best to provide an example ...

In this example, we have a booking with 2 room items and 2 extras items for Mr Smith and Mr Jones. We will create 2 invoices for this booking - one for each room as the guests require separate invoices.
Instructions
If creating an invoice at Check Out, you can either click on the booking on your Bookings Calendar and then go into the Finance tab, or hover over the Credit Card symbol in your Arrivals & Departures list as shown below:
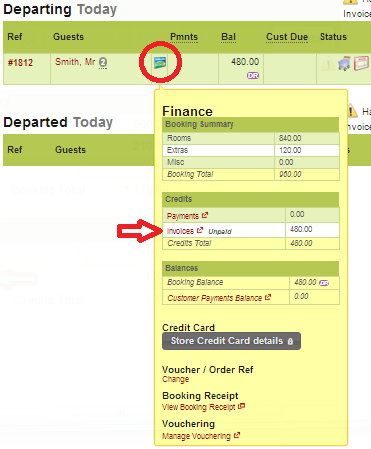
Once you select the Invoice option, the invoice screen will open in a new pop up screen.
- Please note that it will initially show all items for both guests to allow for a single invoice for all items.
- If you are creating an invoice for all items listed, leave all ticked.
- If we want to invoice each guest individually (as in this example), then we can either remove the ticks off the items for the guest you don’t want included in the first invoice or simply select the name of the account or room we do want to invoice in the Account/Room Selector
In this example, we first want to raise an invoice for Jones only, so we select Jones from the Account/Room selector
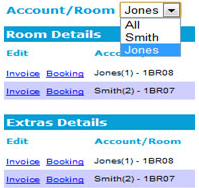
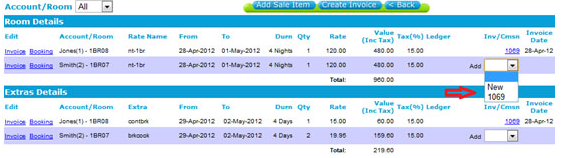
As a result, only items for Jones will be displayed:
In this example booking, 2 payments have been previously added to the booking, one from each guest (as you can see above in the
Payments section at the bottom). If we are going to invoice this booking then we must transfer the appropriate payment to the invoice to show the payment on the invoice.
In the example above we can see that one of the payments has come from Jones (see Ref field) so we will include that payment in the invoice we are going to create.
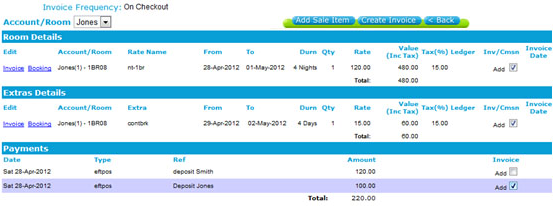
- Ensure that you have ticked all the options you want included in the invoice
- Click the Create Invoice button which will then transfer all ticked items into a draft invoice as shown
- At this stage, no invoice has yet been created.
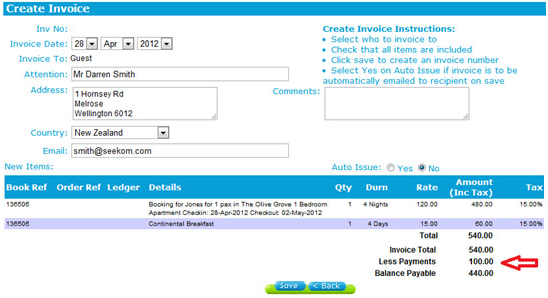
As you can see above, the draft invoice is displaying all the items we ticked and includes $100 in the ‘Less Payments’ total. This is the payment amount we transferred from the booking to this invoice.
- The invoice name and address details are those of the lead guest or booking name.
- As this invoice is for Jones, you may need to update the invoice name and contact details, or simply null the contact details. Comments for this specific invoice can be added at this point if necessary.
- Click the Save button to then save the invoice and create an invoice number.
- If the booking was associated with a sales channel or registered company, an option will be available to select them as the invoiced party in the ‘Invoice To’ field.
- If selected, any details that are saved in their database or settings (such as their name, address, email address, and their own invoice terms – if set) will automatically be entered in the appropriate fields.
Tip - If you want to amend the description details of the item that you are invoicing, you will need to do it before printing or sending the invoice.
You have now created an invoice for the Jones part of the booking which will add some new buttons to the invoice screen as shown below.

- New will create a New Invoice
- Save will Save any changes to this invoice
- Email Log will display a log of any emails sent to customers relating to this invoice
- View/Print will create a presentation invoice with your logo that can be printed and sent to your customer
- Issue opens a screen to allow you to email the invoice and add a further message. The email will send a PDF attachment of the invoice to the recipient which is the same as what is shown in the View/Print option. Once emailed, the invoice is considered as being issued.
- If you want to issue the invoice but not not email it, just leave the email address field as blank.
- Payments will open the payments screen to allow a payment to be added to this invoice.
- Cancel will cancel the invoice and return the items back to their un-invoiced state. This will then allow the booking items to be re-invoiced if necessary.
- A cancelled invoice can be deleted if required but will be logged in the Invoice log in the Reports section in the menu.
- Back will return you to the create invoice screen (but will not cancel or delete the invoice just created).
- Something else that you may notice is that the invoice will also show an additional column labelled Del which allows any invoiced item to be deleted. If an item is deleted from the invoice, that booking item will be unlocked so can be edited if required.
Now that we have completed the invoice for Jones, we have the remaining room and extra item for Smith. If we go back to the create invoice screen by selecting the Back button, you will see that the screen has changed to show the invoice number for the items that have been invoiced and the tick box has been replaced by a selection drop down option for the remaining un-invoiced items.
To create a separate invoice for Smith, select the New option for all items necessary and then click the Create Invoice button.
You can then Save the draft so the second invoice for this booking will have been created.
Tip - If you needed to add another item to an invoice that has already been saved, simply select the invoice number in which to add the item to and select Create Invoice. The item will then be saved to that invoice.
To view an invoice, just click on the invoice number.